Showing Appointment and Meeting details and notes directly in the Calendar
I’ve adjusted the time scale in the Calendar (I’ve set it to 15 minutes), so that my work time hours completely fill the visible Calendar area on my screen.
Now some of my longer appointments are just big blobs of color.
Is there anyway to fill this space with some more meaningful info such as the notes I wrote in the appointment?
 There is indeed a way to show you the appointment details when you enable AutoPreview for your view.
The amount of details that you can see, partially depends on the time slot itself, your screen size and version of Outlook.
Calendar with Preview
Outlook has already a Day/Week/Month view pre-defined with AutoPreview turned on. To switch to this view use;
- Outlook 2003
View-> Arrange By-> Current View-> Day/Week/Month View With AutoPreview - Outlook 2007
View-> Current View-> Day/Week/Month View With AutoPreview - Outlook 2010, Outlook 2013 and Outlook 2016
View-> Change View-> Preview
How and when notes are being shown
In Outlook 2003, notes of an appointment are only shown when there is enough space for it. Meaning, the appointment has to span at least 2 lines of your time scale.
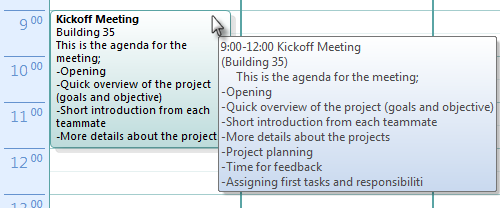
In Outlook 2007 and Outlook 2010, when there is not enough space for the AutoPreview, you can hover with your mouse on the appointment to see more details. However, when the body contains a lot of text, it won’t show all text in the mouse over but will cut it off.
Unfortunately, in Outlook 2013 and continued in Outlook 2016 (in its current Preview Release form), the behavior has returned to Outlook 2003’s behavior and hovering on the appointment will not show any additional body text. The appointment has to span at least 2 lines of your time scale to show some of the body text, or 3 lines when you have a subject set.

Hovering on the appointment in Outlook 2007 and Outlook 2010 shows more details with AutoPreview turned on.
Full Appointment details with the Reading Pane
 When you want to see all the notes of an appointment without needing to open the item in its own window via a double click, you can enable the Reading Pane in the Calendar via: View-> Reading Pane
Depending on your preference and where you have the space for it, you can enable it at the right side or below you Calendar. Additionally, you can resize the pane to your liking. The bottom side might be the best location though as having the Reading Pane on the right in the Calendar could cut off some information when you’ve only assigned it a narrow space.
It works just as the Reading Pane for emails; Click on a Calendar item and its information is shown in the Reading Pane.

