Show if a Read Receipt is being requested or not
Every now and then I receive an email message which requests me to send a Read Receipt. While I don't mind sending one, sometimes the timing is a bit unfortunate.
For instance, when I work late at night or quickly check my email during the holiday. Also, for one mailbox I'm only a delegate and I do not want to send out the Read Receipt for my manager.
Is there a method to easily see beforehand if an email holds a Read Receipt request or some way to send out the Read Receipt at a later time?
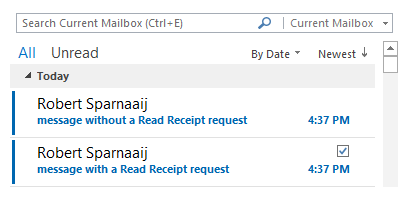
To quickly see if a message holds a Read Receipt Request, you can add the “Receipt Requested” column to your view. By setting the display format of that field to “Icon”, you’ll see a a ticked checkbox for messages with a Read Receipt Request.

By customizing your view, you can easily identify which messages
hold Read Receipt requests.
Note: If you want to read the message in the Reading Pane without having it automatically getting marked as read, and thus request you to send out a Read Receipt, you might need to make some changes to your Reading Pane settings first.
Adding the Receipt Requested column
- Open your view settings;
- Outlook 2003 and Outlook 2007
View-> Arrange By-> Custom… - Outlook 2010 and Outlook 2013
tab View-> View Settings
- Outlook 2003 and Outlook 2007
- Press the Columns… or Fields… button at the top.
- Set the dropdown list selection from Frequently-used fields to: All Mail fields
- Select: Receipt Requested
- Press the Add –> button.
- Change the order of the fields so that “Receipt Requested” is listed between “Subject” and “Received”.
- Press OK to return to the View Settings dialog.

Adding the Receipt Requested column between Subject and Received.
Formatting the Read Receipt column
To make the columns useful and unobtrusive at the same time, we change its formatting.
- From the View Settings dialog, press the Format Columns… button.
- From the “Available fields” list, select: Receipt Requested
- Set the Format to: Icon
- Press OK to close the Format Columns dialog.
- Press OK to close the View Settings dialog.

Setting the display of the Receipt Requested column to an icon.
Note: For messages which do not hold a Read Receipt, sometimes no icon is shown at all and sometimes an unticked checkbox is shown. There is no functional difference between these messages. Usually, the messages which have an unticked checkbox are sent via Outlook by people within an Exchange environment.

