Show all Holidays as Busy or Out of Office on my Calendar
I’ve imported the holidays into my Calendar but unfortunately, these days are not marked as Busy or Out of Office but as Free.
This means that when someone tries to schedule a meeting with me on a (regional) holiday, I’ll be shown as available.
Is there a way to change the availability for holidays from Free to Busy?
 There unfortunately isn’t a quick toggle to change the availability for all Holidays. However, there isn’t a need to manually change the availability for each and every Holiday either.
We only have to manually change 1 holiday and then with the use of a custom View and Drag & Drop, we can change the availability of the other holidays as well.
Step 1: Change the availability of 1 Holiday
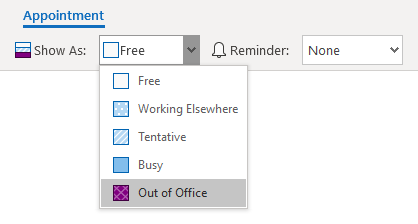
To get started, modify the availability of 1 holiday (doesn’t matter which one) from “Free” to “Busy” or “Out of Office”.
Step 2: Make sure Holiday is added to your Master Category List
 This isn’t really a requirement, but it will make things easier and less confusing.
By default the Holiday Category isn’t in your Master Category List. To add it, open a Holiday item on your Calendar and choose;
- Categorize-> All Categories…
If the “Holiday” category is marked with “not in Master Category List”, select the Category and press the New… button to add it. Optionally, you can assign it a different color.
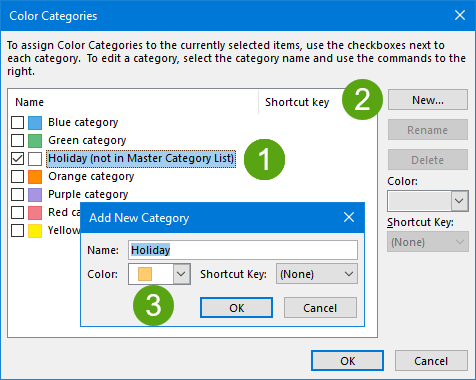
Adding the Holiday category to the Master Category List.
Step 3: Filter view and Group by: Show time as
 The next step is to create a filtered view which will show all holidays in a List View grouped by the “Show time as” field.
This sounds a lot more complicated than it is;
- Change the Calendar View to a List View.
- View-> Change View-> List
- Open the View Settings dialog.
- Outlook 2010 / 2013 / 2016 / 2019 / Office 365 (Classic Ribbon)
View-> View Settings - Office 365 (Single Line Ribbon)
View-> Current View-> View Settings…
- Outlook 2010 / 2013 / 2016 / 2019 / Office 365 (Classic Ribbon)
- Filter the view to only show Holidays.
button: Filter…-> tab: More Choices-> Categories: Holiday
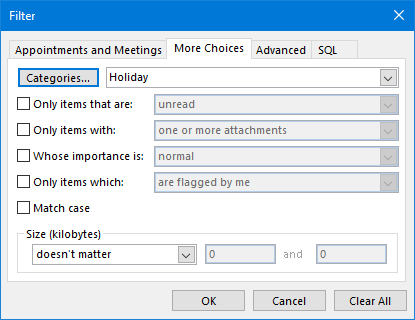
- Press OK to close the Filter dialog.
- Group the holidays by the “Show time as” field.
- button: Group By…
Group items by: Show Time As
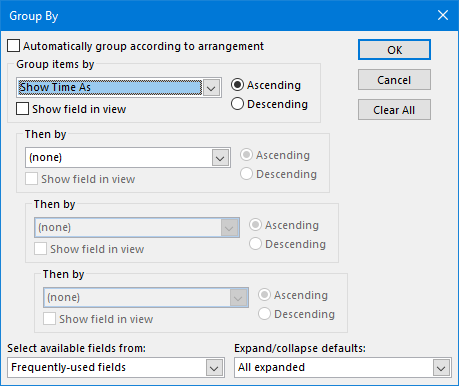
- Press OK to close the Group By dialog and then OK again to close the View Settings dialog.
Step 4: Use drag and drop to update all holidays
 You should now see all Holiday items of your Calendar is a list view.
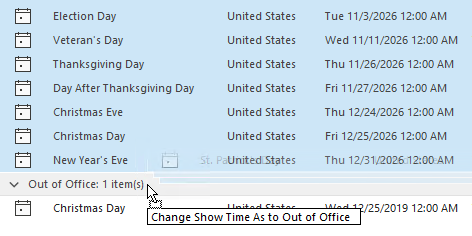
The group at the top is called “Free” and the group all the way at the bottom is called “Out of Office” or “Busy” (depending on what you picked in Step 1).
Click on the “Free” header to select the group and drag & drop it into the “Out of Office” or “Busy” group to change the “Show Time As” for all items at once.
Extra Tip!
As scrolling the selected “Free” group all the way at the bottom might be a bit tricky as it is such a long way down, you can use the following method as well;
- Select the last item in the “Free” group.
- Press CTRL+SHIFT+Home on your keyboard to select all items above.
- Scroll all the way down so that you’ll see the last items of the “Free” group as well as the item in the “Out of Office” or “Busy” group. Make sure you keep your selection active.
- Click and hold down the mouse on the last item in the “Free” group and drag & drop the selection onto the “Out of Office” or “Busy” group to update the “Show Time As” field.
Step 5: Cleanup – Reset the Calendar view
 Now that we’re done updating the items, you can reset the customized List View and change your Calendar back to the default Calendar view.
- Reset the customized List View.
- Outlook 2010 / 2013 / 2016 / 2019 / Office 365 (Classic Ribbon)
View-> Reset View - Office 365 (Single Line Ribbon)
View-> Current View-> Reset View - Change back to the default Calendar view.
- View-> Change View-> Calendar

