Split your message compose window
When I reply to a somewhat longer email, I find myself scrolling quite a lot between the original message at the bottom and then back up to where I left off writing my reply message.
While you could open the message in its own window and position and resize it in such a way that it sits nicely next to your compose screen so you can read them both, it is a somewhat cumbersome solution.
Did you know that you could split your message compose window directly from within Outlook?
 The Split Window command creates 2 scrollable end editable areas within your message window so that you can have your own text at the top, and the original text at the bottom even when the message is longer than your screen's height.
This is a really useful feature but probably one of the most hidden in Outlook. In Outlook 2013 and Outlook 2016, it is only accessible when you add the command for it to the Quick Access Toolbar or Ribbon yourself.
Outlook 2010 and previous
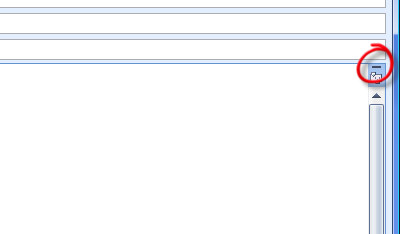
 When you are composing your message, you’ll see a small line on the right side of your screen which is placed directly under the message header but above the vertical scrollbar and the ruler icon.
Hover on this line and your cursor will change to a line with an arrow pointing upwards and an arrow pointing downwards.

Selecting the Split line requires a bit of precision aiming.
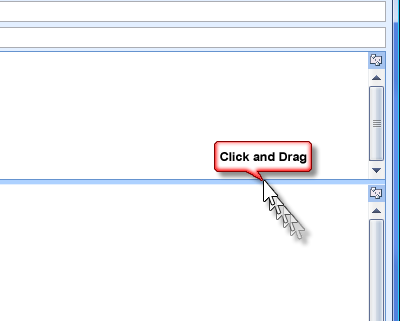
Click and hold down your left mouse button, You can now drag this line down and your message will be split in two areas with both sections holding its own vertical scrollbar. This way you can keep the top screen to where you are typing and scroll the bottom screen to the section of the original mail you are replying to.

You can move the splitter to resize the 2 areas within the window.
To undo the splitting of the window, you’ll simply drag the line to the top again.
Note: This also works when you double click a message to open it in its own window in Outlook 2007 and Outlook 2010. However, then you won’t see a ruler icon though. You might see a panning hand above the vertical scrollbar when you have a Touch or Pen enabled computer.
Outlook 2013 and Outlook 2016
 With the “minimalistic-interface” redesign of Outlook 2013, even this tiny line had to go as a scrollbar is only shown when needed. But even when the scrollbar is shown, you won’t be able to split your screen in the way you can do it in previous versions of Outlook.’
Instead, you’ll need to add the Split command to your Quick Access Toolbar (QAT) or Ribbon. This is a really easy process though and the cool thing is that it now also works in the Reading Pane for both reading messages as well as replying from within the Reading Pane.

The Split Window command added to the QAT in Outlook 2013.
- Open the Options dialog via: File-> Options
- On the left select either “Customize Ribbon” or “Quick Access Toolbar” depending on where you want to add the command.
- Set the “Choose commands from” drop down list to: Commands Not in the Ribbon
- From the list of commands select; Split
- When you are adding it to the Ribbon, complete these additional 2 steps:
- In the pane on the right, select a tab to add the command to.
For instance, the Format Text tab. - Press the “New Group” button and name the group. For instance: View
- In the pane on the right, select a tab to add the command to.
- Click the button: Add > >
- Click OK.
When you click on the Split button, the window will directly split in half and you can click on the split line and hold down your left mouse button to adjust the split by moving it up or down.
To undo the split, click again on the Split Window command in the Ribbon or QAT.

Resize your split message areas by dragging the split line up or down.
Repeat the above process for each window that you want the command to be available for. You can for instance add it to the QAT or Ribbon of the main Outlook window (which shows your message list), the New Email window and the window that you get when you open a message in its own window via a double click.
Extra tip:Now that you are customizing the QAT or Ribbon anyway, you might also want to add the Ruler command to the Ribbon or QAT as that is now also a “hidden command” in Outlook 2013 and Outlook 2016.

